

Ring Stacking Ideas That Actually Look Good
Start with one anchor ring and build outward with 1–3 thinner bands, leaving a sliver of skin visible between each ring.
Three quick combinations to try right now:
- Minimalist: One plain gold band (anchor) + two ultra-thin silver bands on the same finger, staggered slightly apart.
- Mixed-metal: A wide oxidized silver ring (anchor) + one rose gold stacker + one yellow gold midi ring on an adjacent finger.
- Gemstone anchor: A bold amethyst solitaire (anchor) + two slim pavé bands flanking it, nothing else on that finger.
The reason this recipe works is visual hierarchy. The anchor draws the eye; the thinner bands frame it without competing. Negative space, those small gaps of skin, keeps the hand readable instead of ringed-to-the-knuckle chaotic.
Key Takeaways
A well-built ring stack starts with one strong anchor and grows outward with intention, not volume.
| Point | Details |
|---|---|
| Anchor first, always | Choose one statement ring before buying any supporting bands. |
| Mix textures, not just metals | Pair hammered, smooth, and twisted finishes to create contrast that reads as deliberate. |
| Spread across fingers | Distributing 2–4 rings across two or three fingers keeps the hand balanced for everyday wear. |
| Size for position | Order thin bands a half size up; ask your jeweler about sizing for the specific finger slot. |
| Goth for alternative stacks | Goth’s curated marketplace offers gothic and occult rings sized and styled for layered, motif-driven stacking. |
Table of Contents
- What is ring stacking, exactly?
- What types of rings work best for stacking?
- How do you build a balanced ring stack step by step?
- What stylish ring stacking ideas can you try right now?
- How should you pair engagement and wedding rings in a stack?
- How do you care for stacked rings and prevent wear?
- How do you build a gothic or alternative ring stack?
- What does building a ring stack actually teach you?
- Where can you find rings built for alternative stacking?
- Sources
- FAQ
What is ring stacking, exactly?
Ring stacking is the intentional layering of multiple rings on one or more fingers to create a cohesive, curated look. The key word is intentional. Wearing three rings because you grabbed them off the nightstand is not a stack; arranging them by width, texture, and placement so they read as a single composition is.
What separates a stack from a matching set is curation over time. A matching set is bought as a unit; a stack is built piece by piece, each ring chosen for how it relates to the others. That slow accumulation is also what gives a stack personal meaning.
What types of rings work best for stacking?
Not every ring stacks well. Width, profile height, and setting style all affect how rings sit together on the finger.
- Statement/anchor rings: Wide bands, bold stones, or sculptural shapes. These are the centerpiece. One per stack, usually.
- Slim bands: Plain metal, twisted wire, or hammered bands in 1–2mm widths. These are the workhorses of any stack; they fill space without adding visual noise.
- Gemstone rings: Bezel-set stones stack better than prong-set ones because the metal collar sits flush and won’t catch on neighboring rings.
- Midi/knuckle rings: Worn above the knuckle on the middle phalanx. They add height to a spread-across-fingers look without crowding the base.
- Eternity/pavé bands: Continuous stone settings that add sparkle without bulk. Pair them with plain metal bands so the stones have room to read.
- Signet rings: Flat-faced, low-profile, and excellent anchors for gothic or vintage stacks. The flat face gives the eye a place to rest.
Profile matters as much as width. A high-set prong solitaire will push neighboring rings away and create uneven gaps. Flat or low-profile settings sit flush and allow rings to touch naturally.
Pro Tip: When ordering thin stacking bands, size up by a half size from your usual. Rings worn in groups tend to feel tighter than a single ring at the same size, especially in warm weather. Ask your jeweler about “sizing for position” if you’re buying rings intended for a specific finger slot.
How do you build a balanced ring stack step by step?
The Gem Press recommends sizing each ring for its intended position, often in half-size increments, to prevent spinning and keep the composition intact. That detail belongs in the build process from the start, not as an afterthought.
- Pick your anchor. Choose one ring that has presence: a wide band, a colored stone, a sculptural shape. Everything else will be chosen in relation to this ring. If you don’t have a clear anchor, the stack will look like a pile.
- Choose supporting bands. Aim for 1–3 bands that differ from the anchor in at least one way: width, texture, or metal. A hammered band next to a smooth one, or a rose gold band next to silver, creates contrast that reads as intentional.
- Spread across fingers. Per Jason Hyde’s 2026 guide, 2–4 rings work well for everyday wear; 4–5 or more suit a statement look. Distributing rings across two or three fingers keeps the hand balanced rather than top-heavy on one finger.
- Check fit and sizing. Put the rings on, make a fist, open your hand. Rings should not spin freely or pinch. If a ring migrates toward the knuckle, it needs to be sized up for that position. Jewelers of America notes that professional resizing and correct proportions are central to long-term wearability.
- Final tweaks. Photograph your hand against a neutral background. What looks fine in the mirror sometimes reads as crowded in a photo. Remove one ring and see if the stack improves. Often it does.
Pro Tip: Buy your anchor ring first, wear it alone for a week, then shop for supporting bands. You’ll make far better choices once you know exactly what you’re working around.
What stylish ring stacking ideas can you try right now?
Eight named recipes, each with components, the visual logic behind it, and one swap to make it your own.
- Minimalist: Two ultra-thin plain bands plus one slightly wider hammered band. Works because the texture difference does all the work. Swap: replace one plain band with a thin diamond eternity band.
- Mixed-Metal: Yellow gold anchor + rose gold slim band + silver midi on the index finger. The three metals unify because they share the same warm-to-cool gradient. Swap: add a black rhodium band to push contrast further.
- Vintage Glam: Art Deco-style filigree ring (anchor) + two thin milgrain bands. The milgrain edge echoes the filigree detail and ties the look together. Swap: use a marquise-cut stone anchor instead of round.
- Bohemian: Turquoise or labradorite bezel-set anchor + two twisted wire bands + one midi ring on the middle finger. Swap: swap turquoise for moonstone for a cooler palette.
- Bridal/Wedding: Engagement ring (anchor) + contoured wedding band + one thin pavé band on the pinky. The contoured band nestles against the engagement ring without gaps, per GIA’s stacking guidance. Swap: add a plain metal band on the ring finger’s other side for symmetry.
- Birthstone Trio: Three slim bands, each set with a different birthstone in a bezel setting. The matching band style unifies; the stones provide color variation. Swap: use the same stone in three different cuts for a tonal version.
- Statement Concentrated: One large cocktail ring (anchor) + nothing else on that finger + one thin band on each adjacent finger. The restraint is the point. Swap: add a single midi ring above the anchor for vertical interest.
- Asymmetric Edit: Three rings on the index finger (anchor + two bands), one signet on the pinky, nothing in between. The gap is intentional and creates breathing room. Swap: move the signet to the thumb for a bolder spread.
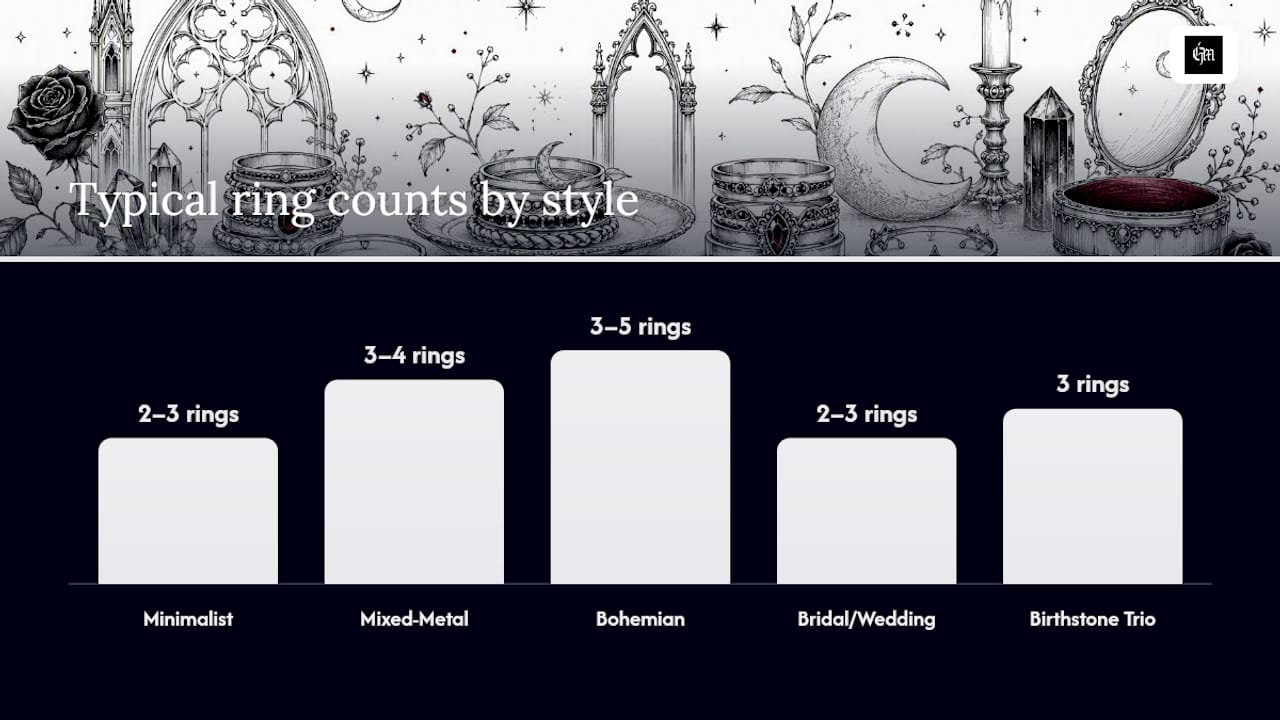
A practical reference for placement and ring counts:
| Style | Best finger(s) | Typical ring count | Best metal(s) |
|---|---|---|---|
| Minimalist | Ring or middle | 2–3 | Yellow gold, silver |
| Mixed-Metal | Ring + index | 3–4 | Mixed (gold + silver) |
| Vintage Glam | Ring finger | 2–3 | Yellow gold, rose gold |
| Bohemian | Middle + index | 3–5 | Silver, brass, copper |
| Bridal/Wedding | Ring finger | 2–3 | Matching metal to engagement ring |
| Birthstone Trio | Middle or ring | 3 | Yellow gold or silver |
| Statement Concentrated | Any single finger | 1 + 2 adjacent | Any |
| Asymmetric Edit | Index + pinky | 3–4 total | Mixed or tonal |
Pro Tip: Visual inspiration boards on Pinterest are genuinely useful for seeing how spreads across multiple fingers read as composition rather than clutter. Screenshot stacks you like and compare the finger distribution before you shop.
How should you pair engagement and wedding rings in a stack?
The traditional order places the wedding band closest to the heart (innermost on the ring finger) and the engagement ring above it. That convention holds for most people, but it is not a rule you have to follow.
- Contoured bands are worth the investment. A curved or chevron-shaped wedding band nestles against the engagement ring’s setting without creating a gap. GIA specifically recommends contoured bands and matching proportions for bridal stacks to avoid competition with the center stone.
- Buffer rings protect prong settings. A plain metal band placed between a high-set solitaire and a pavé band prevents the pavé stones from catching on the prongs over time.
- Match the metal, or commit to contrast. A yellow gold engagement ring with a silver wedding band reads as accidental unless you add a third ring that deliberately bridges the two metals.
- Scale matters. A delicate 1.5mm wedding band will disappear next to a wide-shank engagement ring. Choose a band at least half the width of the engagement ring’s shank.
- Leave breathing room for the stone. The center stone should still be the focal point. If your stack is pulling the eye away from it, remove one band.
Pro Tip: Add an eternity band on the other side of the engagement ring (above it, toward the knuckle) rather than below it. This frames the center stone symmetrically and gives the stack a finished, intentional look without crowding the wedding band.
How do you care for stacked rings and prevent wear?
Rings worn in groups experience more friction, more chemical exposure, and more mechanical stress than a single ring. A little routine maintenance keeps them looking sharp.
Daily habits to build:
- Remove stacks before washing dishes, applying lotion, or using cleaning products. Harsh chemicals strip plating and dull gemstones.
- Take rings off before heavy manual work or exercise. Metal-on-metal friction accelerates scratching.
- Store rings separately or in a lined tray so they don’t scratch each other overnight.
Cleaning by material:
- Plain gold and silver bands: Warm water, a drop of dish soap, soft toothbrush. Rinse and dry completely.
- Plated rings: Wipe with a damp cloth only. Soaking strips plating faster.
- Gemstone rings: Avoid ultrasonic cleaners for emeralds, opals, pearls, and any stone with inclusions. Ultrasonic vibration can crack these stones, per jeweler guidance from Brilliant Earth.
- Oxidized silver: Clean with a soft cloth only. Soap and water remove the intentional darkening.
Ring guards and spacers: A thin silicone ring guard placed between two rings reduces metal-on-metal abrasion and keeps rings from spinning. Particularly useful when a statement ring sits next to a delicate pavé band.
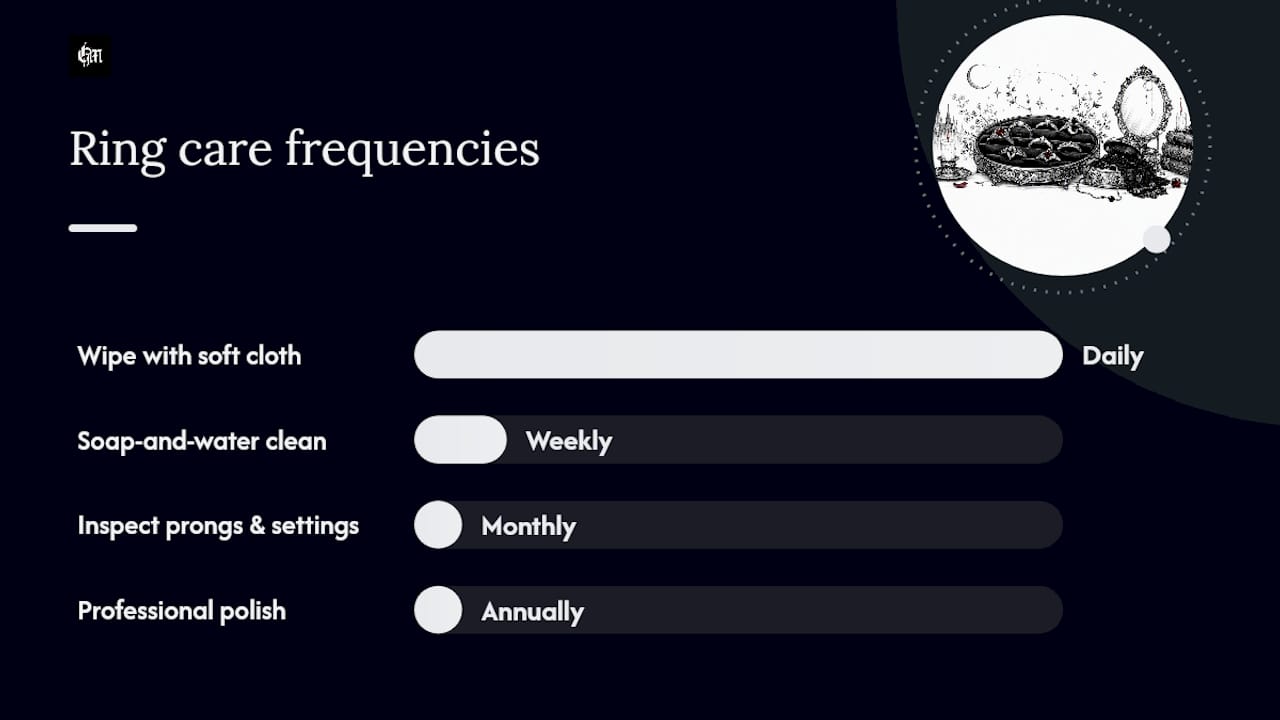
| Task | Frequency |
|---|---|
| Wipe rings with soft cloth | Daily |
| Soap-and-water clean (metal bands) | Weekly |
| Inspect prongs and settings | Monthly |
| Professional polish/check | Annually |
Pro Tip: Jewelers of America recommends professional resizing and inspection at least once a year for rings worn daily. A jeweler can catch a loose prong before you lose a stone, and re-plate a worn gold-filled band before the base metal shows.
How do you build a gothic or alternative ring stack?
Goth’s curated marketplace is built specifically for this kind of intentional, motif-driven stacking. The pieces are sized and styled for layering, sourced from independent creators who design for the alternative aesthetic rather than adapting mainstream jewelry.
Four gothic stack recipes:
- Signet/Pentacle Stack: A flat-faced gothic stainless steel statement ring as the anchor + two slim oxidized silver bands. The flat signet face gives the eye a resting point; the oxidized bands echo the dark finish without competing.
- Oxidized Silver and Black Stone Stack: A wide oxidized silver band set with a black onyx or jet stone (anchor) + one hammered silver band + one thin plain band. Three rings, all in the same tonal family, but different in texture.
- Heavy Metal with Thin Accents: A chunky dark-aesthetic statement ring on the middle finger + two ultra-thin bands on the index finger. The weight contrast is the point. Nothing on the ring finger keeps the hand from looking overloaded.
- Occult Symbol Trio: Three rings, each carrying a different symbol (moon phase, pentacle, serpent), all in matching silver tone. A silver-tone dark aesthetic ring set is a practical starting point for this recipe because the pieces are already designed to coordinate.
Scaling heavier pieces: chunkier rings need more negative space around them. If your anchor is wide and sculptural, keep adjacent fingers bare or use a single thin band per finger. The hand reads as composed when there is contrast between the heavy piece and the open space beside it.
Pro Tip: Gothic rings often run slightly larger in the shank to accommodate detailed settings. Order your usual size first, then adjust. For alternative styling ideas that go beyond rings, Goth’s editorial blog covers the full accessory picture.
What does building a ring stack actually teach you?
The conventional advice is to plan your stack before you buy. Buy the anchor, map out the bands, choose a metal palette, then shop with a list. That approach works on paper and produces stacks that look fine but feel assembled rather than found.
The stacks that actually feel personal are built the other way around. You find a ring that stops you, buy it, wear it alone for a while, and then start noticing what it needs beside it. That process is slower and occasionally produces a ring that never quite fits into a stack, but it also produces stacks that mean something. A ring you bought because you loved it will always read differently than a ring you bought to fill a gap.
The other thing worth saying: photographing your hand is not vanity. It is the single most useful diagnostic tool for a stack. What looks balanced in the mirror often looks crowded in a photo, and vice versa. Take the photo, look at it the next day, and trust what you see.
Where can you find rings built for alternative stacking?
Goth’s curated jewelry collection is one of the few places online where the rings are designed with alternative stacking in mind from the start. Independent creators on the platform build pieces around gothic, occult, and dark-aesthetic motifs, which means the proportions, finishes, and symbolic details are already calibrated for layering rather than standalone wear.

The stack recipes in the gothic section above map directly to pieces available on the marketplace. Whether you’re starting with a signet anchor or building out an oxidized silver spread, browsing Goth by metal and motif is a faster path to a composed alternative stack than hunting through general jewelry retailers for pieces that happen to fit the aesthetic. Browse the full jewelry category and use the style recipes from this article as your shopping list.
Sources
- Guide on how to stack rings — GIA (4Cs blog)
- Ring Stacking in 2026: The Rules That Actually Work — The Gem Press
- How to Stack Rings: A 2026 Styling Guide | Jason Hyde
- Jewelers of America (trade resource)
FAQ
What is the basic rule for stacking rings?
Start with one anchor ring and add 1–3 thinner bands that differ in texture or width. Leave a small gap of skin between rings when possible; that negative space keeps the stack readable rather than cluttered.
How many rings should you stack on one finger?
Style guides commonly recommend 2–3 rings per finger for most everyday looks. More than three rings on a single finger requires deliberate sizing and composition to avoid migration and crowding.
Should you stack rings on multiple fingers?
Yes. Spreading rings across two or three fingers creates a more balanced look than loading one finger. Jason Hyde’s 2026 guide suggests 2–4 rings for everyday wear distributed across fingers, with 4–5 or more reserved for statement looks.
How do you mix metals when stacking rings?
Use a dominant metal for the majority of the stack and let the secondary metal appear in one or two accent pieces. This ratio keeps the combination looking curated rather than mismatched, per the AJLuxe mixing-metal guideline.
What is “sizing for position” and why does it matter?
Sizing for position means ordering each ring at the size that fits correctly in its specific spot on the finger, often slightly larger than your standard size for rings worn in groups. The Gem Press notes this prevents spinning and improves overall comfort and composition.
How do you stack rings with an engagement ring?
Place the wedding band closest to the palm (innermost), with the engagement ring above it. Use a contoured or curved wedding band to nestle against the engagement ring’s setting without gaps, as GIA recommends. Add a thin pavé or plain band on the outer side to frame the center stone symmetrically.